Brand New Glass Year

Again, it’s been a while. Time away seems to have increased my confidence at the torch, perhaps not surprisingly. I realize, again, that there is no reason to be cautious with melted glass. If it doesn’t work, you haven’t lost much: some time and a few pennies’ worth of glass. The rewards of taking risks and experimenting are incalculable.

The Creation is Messy (CiM) glass I got at Frantz is delightful to work with. The colors are beautiful, it is stiff and malleable, and easy to sculpt. David asked me to do fireballs, and I had fun using CiM (gunmetal), Effrete (fire red), and Vetrofond (tangerine sparkle). How lucky they all have the same COE (104)!

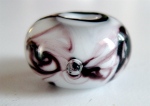
For the fireballs: I used gunmetal (black) for the round base bead (for one of them I used a special millefiore and raked it through the black, which accounts for the bit of green you can see in the photo). I encased part of the base bead with red, then encased part of that with tangerine sparkle. I let all the glass melt and droop, then used a smasher to flatten the droop. I used glass scissors to cut it into sections, then used tweezers to pull the shapes. I added dots to one of the fireballs, and encased the head of the other one with clear glass.

I used the new CIM rose quartz, electric avenue blue, and celadon for the pastel dot beads. I couldn’t believe how the dots didn’t melt flat as I worked on the bead, and I was able to pull corners on green dots so easily. Unfortunately, I didn’t keep the base bead heated well enough as I worked (for a good 10 minutes), and it cracked (although it is still intact, it WILL break eventually). I love how the dots at the center of the green look like reduction glass. They are really just rose on blue on ivory dots. I did bubbles on the corners of the green, which you may not be able to see in the photographs.

I am very excited to enter a new phase of beadmaking. The fun will come from having better control of my technique, and I do feel steadier and more confident.

Got Waylaid!

Well, I was going to test whether Vetrofond can be sculpted into forms as easily as Bullseye, and got distracted. Really like these beads, and will do more sets in different colors. The trick is to get them the same size.

droopy form

I woke up yesterday morning thinking about how to do a necklace bead along the same lines, and got this in my head. Happy that the execution worked, even while chatting simultaneously to my roomie Robin.

Venerable Bead

The colors for both actually do match, but they were edited in different programs 😉

Elemental Forms Set Plan Pt. 1

Earth Air Fire Water.
Earth and Fire will be wheels.
Air and Water will be floaty forms like this:

Seaform III

Seaform III


Browns and greens for earth.
White and blue for air.
Red, yellow, w/hints of white and blue for fire.
Blue and green for water.
um, duh! pretty predictable, but I hope to have some inclusions to liven up the mix, silver gold copper & maybe reduction frits and enamels.
I’d like to make several sets, but first: what am I making them for?
Do I make the beads first and see what jewelry calls out to me?
Or decide on the piece first and make beads to order?
I’ll decide soon, because I’d like to get started!

Bead Fail!

Last couple of outings have not been so great. No plan. Wait, I knew that.

One thing I did learn: Even though I’m practicing encasing, it is counterproductive to encase a perfectly good bead just for its own sake.

Made three “subtle stripe” beads last night, and each one is wonky-shaped. Bad.

Made a poor excuse for a “goddess bead” night before last. Finally took a good look at it this morning, and it’s not horrible. Just nothing new.

I need to give my next torch session more thought. Have a, you know, creative process instead of just grabbing stuff.

Misc Glass

My random week continued with a couple more bullseye beads that I’m not really bothering to post. However, yesterday I brought out my 104 again and decided to work on encasing.

One encasing exercise was a globby bead with lots of silvered ivory and some deep transparent purple (I thought it was Helix Psyche, but I was mistaken, or else it just didn’t react). I encased it and pressed it in the lentil mold. It turned out quite nicely, as the encasing was even on both sides.

The second encased bead was blueberry-white Moretti with purple free-form stringer, swirled with a dragging tool and encased. The bubble action is very nice. The shape — sorta iffy, but good enough for something or the other I’m sure.

Next I turned to the silvered ivory stringer pages in Passing the Flame and decided to try the nebula bead. I’m very happy with the way it turned out for a number of reasons. Foremost is that the shape of the bead turned out quite nice. Second, the colors that came out were unexpected. There is some gold in there, and midnight blue. I wonder if this is because my silver palladium is old and a little tarnished. If so, I will always keep some back to age thusly.

Next time make a plan

Made some random beads tonight that may or may not work. I made a caterpillar, but I fear it will crack. I don’t think I kept it backed into the flame enough as I was working (endlessly it seemed) on the dots. Also, very bad stringer control, a little shaky and maybe just a little tired after last night’s successes.

Tried to make a butterfly sort of thing, and a really funny thing happened. As I was adding glass to the sides for “wings,” I suddenly noticed 3 rows of glass I had added were just…gone. I looked around my work area, and never did find them. This is generally something you don’t want to happen, because duh glass is hot. It will burn ya! And your clothes. And your carpet.

Then tested out my lentil and pillow molds, with dubious results. Need to figure out exactly how much glass to melt for a perfect fit. Did discover that the Bullseye Orange Marmalade is a really pretty glass.

Will post pix tomorrow.

Sea change

I think I beat my previous record for a torch session: 12 beads in two sittings.

I feel…sorta possessed. Working with the Bullseye glass had given me new energy. It seems to be very forgiving. Having the kiln going for immediate annealing also helps, especially for the thin, scalloped discs. I had not one single casualty!

Seaform III

Seaform III


This is a thin disc of different colored layers, flattened and shaped as it grew. The edges were scalloped with the dragging/poking tool, and dots applied to the disc as the last step.

My last bead of the night:

Crayzee Dayzee

Crayzee Dayzee


same process as above, but the disc is fatter so the “petals” wouldn’t droop. Then went all fussy on the dotting, which is not as neat as I would like, but hey, I’ll take it!

Something has happened in this past couple of months, but especially in the last few days since pulling out the Bullseye rods from the corner. I feel more in control. Though I’ve been more than willing to take chances this last two months and not mind failing, upping my chances of success with the tools I use has been a phenomenal experience.

So the question is, how — or indeed WHETHER — to transition from COE104 (Moretti/Effrete/Vetrofond) to COE90 (Bullseye, most likely). I will use up my current stock of about 15-20 rods before making a commitment: Bullseye can be a bit pricey, and there’s no need to hurry the process. On top of price, there are space constraints, if a new collection of rods is to be as organized and handy as my current set-up — a necessity, not a choice.

Now I think I know why I was able to purchase collections of cheap glass from eBay when I first started lampworking! I think I will not do a complete turn-around, as I have lots of COE104 that I really, really like, especially my Vetrofond oddlots (of which I will be getting another bundle soon). There’s plenty of room for all of it under my tent!

Seaforms

I decided to mess about with some Bullseye glass that I’ve had forever and have barely used. The last time I tried, I was not happy…but I was also not quite as adept at the torch as I am now.

I didn’t really have a plan. I made a twistie, but it was really hard to pull. Bullseye is a bit stiffer, and I also didn’t have my punties ready for action (forgot to snip off the sharp ends, duh!). So that didn’t turn out well at all. I figured I’d choose some colors, pull some stringers, and just see how it felt.

I made a base bead out of swirly, transparent dark orange, then used dark orange opaque stringer (which barely showed up) and green sparkly stringer (which most emphatically did!). Then grabbed my poking/dragging tool and inadvertently pushed some of the glass up, and it didn’t just flop back into place. I pushed the next bit down, and then saw that the glass is stiffer, and takes/holds a shape very nicely.* I repeated the pattern a couple more times to make a scallop or clamshell shape. I added a few light purple dots around the scalloped edge, and that was that.

It was so easy to repeat, I made three. And two smaller spacer beads.
Seaforms
I am so happy with these beads, I am going to make a whole bunch of sets using different color palettes. If I am happy with them (and why wouldn’t I be?), I think I’ll make the leap and get the Bullseye sampler. I’ll try the same design, of course, using the Moretti/Efrete/Vetrofond that I’ve got, too, just to see if there is a marked difference.

This is fun, this is exactly what I want to do right now! Experiment and document, and hopefully find my own voice at the torch.

*The stiffness is what I didn’t like when working with Bullseye in my first few months of flameworking. Now that I am doing more complex stuff, I think it will be an advantage. From what I have been reading, stacked dots are easier to control, as they don’t spread so quickly. It will be easier to “sculptural” beads, too. If I decide to do that. (Many artists who do sculptural glass use boro because it has low COE and thus higher melting point, making it easier to shape and manipulate. It is also used for blown glass.)

More Twists and Silly Bead

Made a complex twistie that I was really happy with, two larger rods (electric blue and cobalt) and two white stringers between. Then I decided I wanted to use it on a bead, but didn’t make a plan. This is what happened.

Ridiculous Bead 3

Totally silly. I made a pretty nicely shaped cylinder, then used a shaping tool to make a “neck”. Then started applying the blue twistie to the top and twirling and dragging almost compulsively. I can’t leave anything alone for a second! This is why I don’t have two beads alike. When I encased the whole mess, I got a big glob of clear on one side, so made some grooves in the glass and applied light blue dots.

The bottom part I just used some of the twisted cane stringers, melted them in and dragged the melted glass with a pick. Add a few dots and voila! One. Silly. Bead.

Complex Twist!

Hooray! I successfully twisted a cane with 3 colors! It wasn’t a pretty process (one of my punties broke near the base, and I had to remelt it and get it to harden, while still keeping the “blob” of three colors flowy). The end result looks like I knew what I was doing, pretty much.
complex twistie

Of course, the next big step is learning how to actually use the twisted cane. I tried it on a black base bead. The colors were pretty enough, but I got the cane too hot and it lost its integrity.
mediocre use of twisted cane stringer

As I’ve said before, stringer application is one of my weak points as a lampworker. I’d like to take a class focussed solely on pulling and applying stringer.

« Older entries