Got Waylaid!

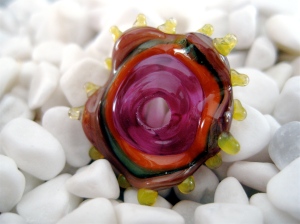
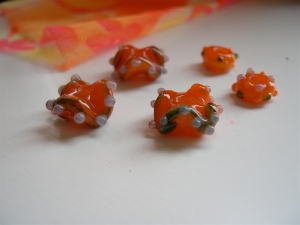
Well, I was going to test whether Vetrofond can be sculpted into forms as easily as Bullseye, and got distracted. Really like these beads, and will do more sets in different colors. The trick is to get them the same size.

droopy form

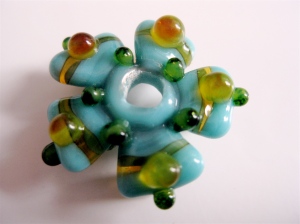
I woke up yesterday morning thinking about how to do a necklace bead along the same lines, and got this in my head. Happy that the execution worked, even while chatting simultaneously to my roomie Robin.

Venerable Bead

The colors for both actually do match, but they were edited in different programs 😉

Elemental Forms Set Plan Pt. 1

Earth Air Fire Water.
Earth and Fire will be wheels.
Air and Water will be floaty forms like this:

Seaform III

Seaform III


Browns and greens for earth.
White and blue for air.
Red, yellow, w/hints of white and blue for fire.
Blue and green for water.
um, duh! pretty predictable, but I hope to have some inclusions to liven up the mix, silver gold copper & maybe reduction frits and enamels.
I’d like to make several sets, but first: what am I making them for?
Do I make the beads first and see what jewelry calls out to me?
Or decide on the piece first and make beads to order?
I’ll decide soon, because I’d like to get started!

Next time make a plan

Made some random beads tonight that may or may not work. I made a caterpillar, but I fear it will crack. I don’t think I kept it backed into the flame enough as I was working (endlessly it seemed) on the dots. Also, very bad stringer control, a little shaky and maybe just a little tired after last night’s successes.

Tried to make a butterfly sort of thing, and a really funny thing happened. As I was adding glass to the sides for “wings,” I suddenly noticed 3 rows of glass I had added were just…gone. I looked around my work area, and never did find them. This is generally something you don’t want to happen, because duh glass is hot. It will burn ya! And your clothes. And your carpet.

Then tested out my lentil and pillow molds, with dubious results. Need to figure out exactly how much glass to melt for a perfect fit. Did discover that the Bullseye Orange Marmalade is a really pretty glass.

Will post pix tomorrow.

Sea change

I think I beat my previous record for a torch session: 12 beads in two sittings.

I feel…sorta possessed. Working with the Bullseye glass had given me new energy. It seems to be very forgiving. Having the kiln going for immediate annealing also helps, especially for the thin, scalloped discs. I had not one single casualty!

Seaform III

Seaform III


This is a thin disc of different colored layers, flattened and shaped as it grew. The edges were scalloped with the dragging/poking tool, and dots applied to the disc as the last step.

My last bead of the night:

Crayzee Dayzee

Crayzee Dayzee


same process as above, but the disc is fatter so the “petals” wouldn’t droop. Then went all fussy on the dotting, which is not as neat as I would like, but hey, I’ll take it!

Something has happened in this past couple of months, but especially in the last few days since pulling out the Bullseye rods from the corner. I feel more in control. Though I’ve been more than willing to take chances this last two months and not mind failing, upping my chances of success with the tools I use has been a phenomenal experience.

So the question is, how — or indeed WHETHER — to transition from COE104 (Moretti/Effrete/Vetrofond) to COE90 (Bullseye, most likely). I will use up my current stock of about 15-20 rods before making a commitment: Bullseye can be a bit pricey, and there’s no need to hurry the process. On top of price, there are space constraints, if a new collection of rods is to be as organized and handy as my current set-up — a necessity, not a choice.

Now I think I know why I was able to purchase collections of cheap glass from eBay when I first started lampworking! I think I will not do a complete turn-around, as I have lots of COE104 that I really, really like, especially my Vetrofond oddlots (of which I will be getting another bundle soon). There’s plenty of room for all of it under my tent!

Seaforms

I decided to mess about with some Bullseye glass that I’ve had forever and have barely used. The last time I tried, I was not happy…but I was also not quite as adept at the torch as I am now.

I didn’t really have a plan. I made a twistie, but it was really hard to pull. Bullseye is a bit stiffer, and I also didn’t have my punties ready for action (forgot to snip off the sharp ends, duh!). So that didn’t turn out well at all. I figured I’d choose some colors, pull some stringers, and just see how it felt.

I made a base bead out of swirly, transparent dark orange, then used dark orange opaque stringer (which barely showed up) and green sparkly stringer (which most emphatically did!). Then grabbed my poking/dragging tool and inadvertently pushed some of the glass up, and it didn’t just flop back into place. I pushed the next bit down, and then saw that the glass is stiffer, and takes/holds a shape very nicely.* I repeated the pattern a couple more times to make a scallop or clamshell shape. I added a few light purple dots around the scalloped edge, and that was that.

It was so easy to repeat, I made three. And two smaller spacer beads.
Seaforms
I am so happy with these beads, I am going to make a whole bunch of sets using different color palettes. If I am happy with them (and why wouldn’t I be?), I think I’ll make the leap and get the Bullseye sampler. I’ll try the same design, of course, using the Moretti/Efrete/Vetrofond that I’ve got, too, just to see if there is a marked difference.

This is fun, this is exactly what I want to do right now! Experiment and document, and hopefully find my own voice at the torch.

*The stiffness is what I didn’t like when working with Bullseye in my first few months of flameworking. Now that I am doing more complex stuff, I think it will be an advantage. From what I have been reading, stacked dots are easier to control, as they don’t spread so quickly. It will be easier to “sculptural” beads, too. If I decide to do that. (Many artists who do sculptural glass use boro because it has low COE and thus higher melting point, making it easier to shape and manipulate. It is also used for blown glass.)

More Twists and Silly Bead

Made a complex twistie that I was really happy with, two larger rods (electric blue and cobalt) and two white stringers between. Then I decided I wanted to use it on a bead, but didn’t make a plan. This is what happened.

Ridiculous Bead 3

Totally silly. I made a pretty nicely shaped cylinder, then used a shaping tool to make a “neck”. Then started applying the blue twistie to the top and twirling and dragging almost compulsively. I can’t leave anything alone for a second! This is why I don’t have two beads alike. When I encased the whole mess, I got a big glob of clear on one side, so made some grooves in the glass and applied light blue dots.

The bottom part I just used some of the twisted cane stringers, melted them in and dragged the melted glass with a pick. Add a few dots and voila! One. Silly. Bead.

Goddess Beads

Caelyth

If you Google on “goddess bead,” you’ll see a lot of very lovely, female-shaped beads. Well, I actually have no desire to make a bead like that. My Goddess Beads were made specifically for a Sensual Goddess party I attended on Saturday night. There were to be seven of us, and besides eating, drinking, sharing poetry and stories, we also planned to share gifts.

I got myself in a Goddess Groove on Friday night, and sat at the torch for 3 hours, one of my longest sessions ever. I felt exhausted and energized at the same time when I finally shut down at 10:30 PM, beads soaking in the kiln to be revealed as successes or failures next morning. The beads were pretty large, and I’m always afraid large beads will crack from not staying properly hot while I work on them (between prepping* and working the glass, each bead took about 15-20 minutes to make). I was so happy to see all seven beads turned out crack-free, and quite pretty as well. I made them focal beads on various pieces of jewelry.

This was a great project for me, at this particular time. I’ve been wanting to free myself up and increase the intermixing of spirit, imagination, and technique. Flow, I will call it. Making a bead flow into a piece of jewelry is something I have been sidling up to until now. It all happened here, and it was thrilling.

The lampwork technique was inspired (and instructed) by Sarah Hornik, whom I’ve admired for a couple of years. During the course of making these seven beads, I became much more proficient with my marver, maintaining the cylindrical shape of the bead as I was working in the colors and stripes. My stringer application still sucks, but with this bead it doesn’t matter that much since the stripes get swirled. Mostly, my dots turned out okay, a couple were not “perfect” — but I was happy with them, overall.

Another thing that made me happy was that the holes were nice and “innied” — no jagged bits to grind off. I think this is because I kept marvering the bead to shape as I was working it.

*Prepping: Each bead required making color choices in advance and pulling stringers. The beads are composed of a cylindrical base bead in a light opaque color (pink, yellow, blue were my choices); the top half of the cylinder encased with rubino oro or other light-hued transparent glass (I used rubino oro, light red, and light yellow). After I chose base and transparent, I then pulled stringers complementary stripes applied to the base, for melting and swirling into flowy shapes, and then for dots in the last step. I tried to use different color combinations for each bead, but a couple of them turned out looking a bit similar. I was a little tired by the last bead, and used stringers I had pulled for previous beads, but in a different combination.

Success!

The new cabochons are fabulous. Looks like I got the right size clear overlay piece, and very little bubbling action. Not that I mind bubbles. The backs are much cleaner using kiln paper as opposed to setting the pieces onto the kiln-washed holder, but I like having the texture on the back from the wash. For now, paper is good since I need to “cold fuse” pin backs to the pieces.

I’m particularly pleased that for this application, the fusing program in the Jen-Ken users manual works quite well.

The result of David’s experiment with a metal washer filled with frit was…encouraging. The metal did not take to the high heat too well, but the glass didn’t break apart from the metal upon cooling, which was what we expected to happen. This could be a very interesting direction, if we can find affordable metal of high enough quality to withstand the heat.

My yaller beads look pretty nice. More tonight.

When I started this blog, I resolved to do at least one bead per day when I’m home, no matter how busy/crazy. Last night was a challenge, as I was cold and tired. But once the torch went “whoosh” I got a lot warmer!

Studly Studio

Spent a very satisfying and productive Saturday at our friends’ house in Berkeley (Hothouse), and returned early this AM with a mostly built and tested kaleidoscope — prettifying will happen this week, but the device works, and that was my goal for the weekend.

After getting home, we decided that cleaning the “lab” might be the best use of our time. The lab is a project room that tends to become a junk magnet. We need space to work on the kaleidoscope and other things, so *zing* into cleaning mode. Incidentally, my glass studio has been set up in one corner of one end of the (very large) room since I started lampworking.

During the course of the cleaning, we completely re-vamped my studio! I am so pleased to have my glass-cutting surface freed from the kiln, which is now on an appropriate surface (a tile-covered table). I have a second credenza-type cabinet for storing sheet glass when I finally get my Bullseye assortment, er, assorted.

glass_glass_glass

glasscutting_kiln

This is my lampwork station. Cleaner than usual.

yellow

What’s up?

A new cylinder of gas. A discussion with Jackie at KMG about oxy-propane, and the possibility of switching when a new studio is in the picture. A discussion about boro glass, and how Moretti and Vetrifond and others are offering a similar color palette. An attempt to re-create the wedding cake bead that didn’t work and became a rectangle instead (and not a very good one, either). The need to clean and prepare my used mandrels for the next round of 40 beads. (I made a whole lot of beads this past 2-3 weeks! Hooray. Making up for lost time August – December 2007.)

For Edwardian weekend, I have loads of fused glass to design/assemble/fire (6 cabochons [designed, at least, and 3 assembled] and GoreyScope2 disc [not yet designed, even]). PLUS building Goreyscope2 and making costumery. Good thing I work well under deadline.

« Older entries